Table of Contents

SV405CC Frequently Asked Questions
Q1:What driver does SV405CC support?
A:Windows: sharpcap/NINA/TheSkyX
Linux: AstroDMxCapture
MacOS: AstroDMxCapture
ChromeOS: AstroDMxCapture
Currently, we recommend using this three software, "AstroDMx Capture / NINA / Sharpcap".
Please download the driver from official page.
Q2: Where should the corresponding software be downloaded?
A:Driver software for the PC to recognize the SV405CC and an application to actually capture images from the camera are required. Both can be downloaded from the product page of the SVBONY website.Click "ASCOM Drivers" and "Sharpcap" to download.
Q3: What are the steps for installing the software?
A:
- (1)Use SV405CC deep space camera, operate under windows system, take sharpcap as an example:
- 1. Please download the local driver from the official website and install it.
- 2. Please update the sharpcap software to the latest version. The specific version is subject to the latest official version.
- 3. Connect SV405CC to the telescope, (please prepare other equipment such as telescope and bracket in advance).
- 4. Connect the SV405CC to the computer,
- 5. Open sharpcap software, click camera, click SV405CCcamera to connect
- 6. When the camera is successfully connected, the light and image changes will appear on the screen, and the toolbar on the right will match and display the default parameters. Corner will display exposure time, frame rate and preview frame in sync on the lower left.
- 7.Aim at the observation target, adjust the focus, and get a clear image on the screen.
- (2)Use SV405CC deep space camera, operate under windows system, take NINA as an example:
- 1. The local driver has been installed before, NINA can directly recognize the SVBONYcamera, click the connection to image.
- 2. Please download and install the ASCOM platform, and download the ASCOM driver and install it on the computer.
- 3. Please download or update the NINA software to the latest version. The specific version is subject to the latest official release.
- 4. Connect SV405CC to the computer, and connect SV405CC to the telescope at the same time (please prepare other equipment such as telescope and bracket in advance)
- 5. Open the NINA software, the software automatically recognizes the svbonyASCOMcamera, click the connect button to connect, and you can image.
Q4:How to Run SV405CC camera in current NINA?
A:Svbony updates the SDK. Before N.I.N.A. release new version to support Svbony newest camera, we have a solution to make our camera run in current N.I.N.A..The following are the specific operation steps, which can better help you to operate and install:
Step 1:Download newest SDK from our website.N.I.N.A. works with Windows OS, only need to download Windows SDK.
Step 2:Unzip the SDK file, and find the lib file

Click to enter.

If your PC/laptop run 64bit windows system. Please use x64 dll.file
If your PC/laptop run 32bit windows system.Please use x86 dll.file

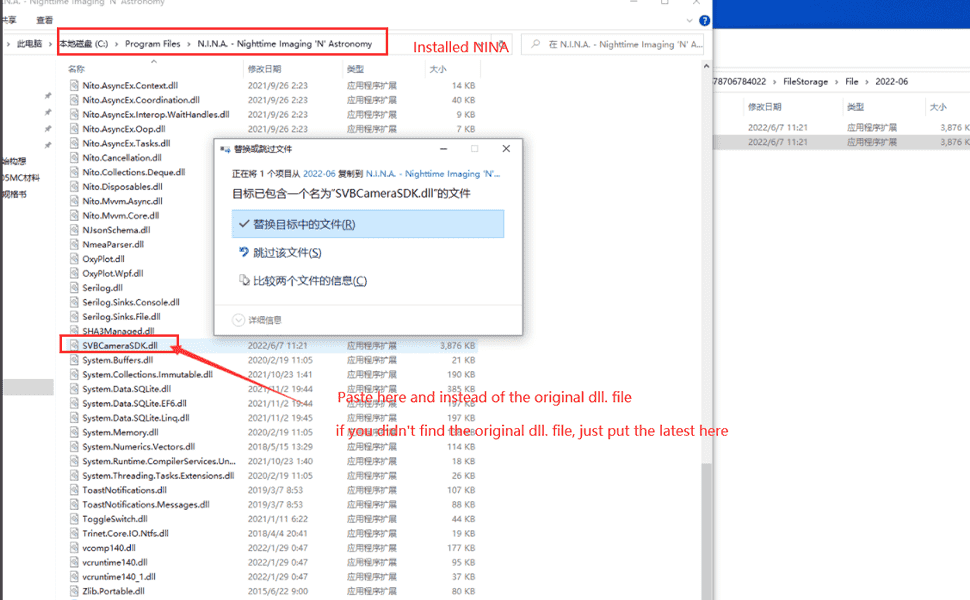
Step 3:Copy the dll. File to to your computer, and paste it into the Installed N.I.N.A. file,
for example:

Step 4:Contact the SV405CC to your computer, and enter the software, then it works.If you have any other questions, please feel free to send email to info@svbony.com.
Q5: why not zero glow?
A:Due to ASCOM's freeze control issues, there is a GMP glow with amplifier glow suppression. It runs automatically during long exposures (120 seconds). The HCG mode adds the glow suppression function, which automatically turns on the glow suppression after exposure for 3 seconds, but it is not completely without glow. Ampere glow can also be removed by dark subtraction.
Comments (2 )
Guest
I have a problem in N.I.N.A. with the sv405 camera. Every time you take a photo, the camera downloads the previous photo to the current one.. This causes problems with the operations of N.I.N.A. such as a plate solving. It seems a memory problem of the


aarp recommended canadian phar
Hi I am so excited I found your blog page, I really found you by error, while I was browsing on Digg for something else, Anyways I am here now and would just like to say thank you for a tremendous post and a all round enjoyable blog (I also love the th