Why Your Astronomy Camera Might Not Be Imaging

Why Your Astronomy Camera Might Not Be Imaging
Introduction
Astronomy photography is an exciting hobby, but many users may encounter issues with their astronomy cameras not producing images. To help you troubleshoot effectively, we've compiled a detailed self-check guide to assist you in diagnosing common problems so that you can enjoy capturing the beauty of the night sky.
1. Check the Power Supply
Ensure your astronomy camera has a proper power supply:
Battery Status: Make sure the camera battery is fully charged or that a new battery is installed.
Power Connection: If using an external power source, check that the power cable is securely connected and that the plug isn’t loose.
2. Verify Connections
Ensure all devices are connected correctly:
Camera to Computer: Use the appropriate data cable to connect the camera to your computer, and check that the data cable is undamaged.
Adapters and T-rings: If you're using adapters or T-rings, ensure they are properly attached and not damaged.
3. Software Settings
Software configuration can often be a key factor in imaging issues:
Drivers: Ensure you have the latest camera drivers installed. If unsure, visit the manufacturer’s website for downloads.
Capture Software Settings: Check the settings in your capture software to confirm that the camera selection, exposure time, gain, and other parameters are correctly configured.
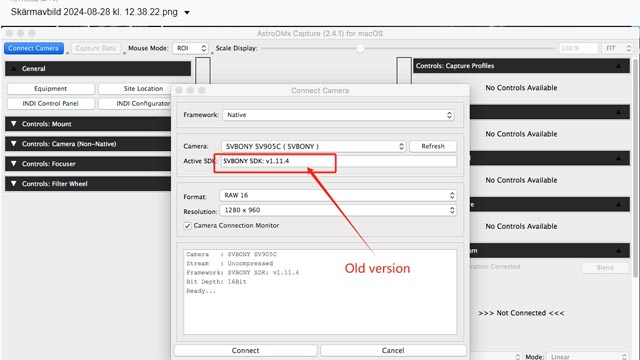
Q: I have tried to get the Sv905C camera to work now for a couple of days straight. The camera is recognised in the PC, but it will not take images.
A: The software version is too old, please update to the latest version( Click here to get the latest version)

4. Lens and Optical Components
Make sure the lens and other optical components are in good condition:
Lens Cleaning: Inspect the lens surface for dust or smudges; clean it if necessary using professional cleaning tools.
Aperture Settings: Confirm that the aperture is set appropriately to allow enough light in.
5. Focus Issues
Improper focus can lead to imaging problems:
Manual Focus: If the camera supports manual focus, make sure you have focused on the target correctly.
Auto Focus: Some cameras feature auto-focus, but this may not perform well in low-light conditions. In such cases, manual focus is recommended.
Q: Everything connects just fine but when I open the camera I get a Pink to Reddish color image.
A: This is a focus problem. When the focus is blurry, all you see are bright lights or colors. Please set the shooting mode to automatic, adjust the telescope's focus wheel, and then focus.

6. Shooting Conditions
External environmental factors can also affect imaging:
Weather Conditions: Cloud cover, haze, or strong winds can impact observation quality. Choose a clear night for shooting.
Light Pollution: Avoid photographing in bright urban areas; seek out darker locations for better results.
7. Check the Memory Card
Issues with the memory card might prevent images from being saved:
Storage Space: Ensure there is ample space on the memory card to save captured images.
Formatting: If the camera indicates a memory card error, try formatting the card within the camera (make sure to back up important data first).
8. Fault Diagnosis
If the above steps haven't resolved the issue, consider the following:
Hardware Malfunction: Inspect the camera and lens for hardware issues, such as circuit board damage or sensor failure.
Contact Customer Support: If the problem persists, it is advisable to contact the manufacturer's customer service or a professional technician for further diagnosis.
Conclusion
When faced with the issue of your astronomy camera not imaging, it’s essential to remain calm and methodically conduct a self-check. By examining the power supply, connections, software settings, optical components, and shooting conditions, you can typically identify the root cause. We hope this blog helps you successfully restore your imaging capabilities and allows you to explore the beauty of the cosmos! For further assistance, please feel free to reach out to us.
Wishing you a wonderful photography experience!


